10 Easy Steps to Reduce Machine Repair Time


10 Easy Steps to Reduce Machine Repair Time
Training
1-Training: A properly trained staff is, in my opinion, the most critical element for reducing machine repair time and downtime in general. I accepted an entry-level maintenance position at a paper company when I was twenty. While I was a decent maintenance mechanic for my age, I lacked diverse hardware experience. The new job had me servicing machinery substantially different than my previous job. One day, my manager assigned me a “simple task.” This task was to replace a ballscrew in a custom Thomson linear actuator. This task, on the surface, appeared simple enough. I proceeded to unscrew the screw from the ball nut, and within seconds there were 62 .125″ precision balls scattered on the floor. The truth is there were many failures in my scenario, but for the point of this article, had I been trained correctly in how ballscrews worked, I would have known that I wasn’t supposed to remove the screw.
Ensure your maintenance team members are qualified to work on the equipment they maintain. If a team member must work on a piece of equipment they are not trained to repair, ensure someone with the proper skills communicates the critical repair details.
Spare Parts
2-Spare Parts: The need for spare parts is obvious, yet this area frequently turns a simple and quick repair into a drawn-out, costly disaster. First, ensure the parts needed to service a machine are on hand before a single tool touches the equipment. It’s equally important to make sure the spare parts are, in fact, the correct parts. Verify the parts when they are received instead of when they are needed. Too often, I have seen maintenance team members take a machine apart and find out they do not have the required parts or correct parts. As a maintenance manager, this is a frustrating scenario.
Store spare parts in an easy-to-locate, clean environment and in an organized manner. This sounds like a no-brainer, but maintenance shops, tool cribs, and storage areas are often disasters.
Bottom line: Stock the correct parts and verify compatibility before the parts are needed.
Tools
3-Tools: I cannot overstress the importance of using proper and professional quality tools. When team members don’t have the correct tools to complete a task or their tools are inferior, the quality of the repair can suffer. Too many times, I have witnessed mechanics create a brand new problem while fixing the original problem.
Furthermore, team members will find shortcuts that almost always result in a callback if time-consuming, complex, or annoying tasks occur. A great example is wire strippers. Guys with low-grade strippers frequently turn to razor blades, pocket knives, or their teeth when stripping small wires. This unacceptable practice often results in nicked insulation jackets and missing individual wire strands. In another post, I wrote about my difficulty stripping the jacket and conductors of Festo cylinder position sensors. I reduced my effort and machine downtime while improving my work quality by purchasing two specialty tools: a Jokari 20310 Sensor Special “Mini” Automatic Wire Stripper and a Knipex Automatic Wire Stripper 12 12 02.
Another example is the wrench flats on an air cylinder piston. Most cheap wrenches are thicker than the flats. When the mechanic can’t get a wrench on the flats, his next choice will be his or her favorite vise grips or channel locks. Both tools will damage the air cylinder piston and create a brand-new problem.
I’m not saying the team needs the best tools money can buy; they need the best tools for the job. If the team can’t afford good tools, buy them for them. You will either purchase tools or pay more for lost productivity and downtime.
Preparation & Kits (Kitting)
4-Preparation & Kits: Being prepared by having replacement parts is, of course, an important part of the repair equation, but there’s more to being prepared than stocking parts. A great way to expedite an efficient repair is to assemble the necessary repair parts as a “Kit” ready to install. For example, a repair is scheduled that requires replacing an air cylinder. These cylinder repairs can turn into a marathon running for additional items such as fittings, flow controls, and Teflon tape. A lot of wasted time. Another variation of this example is the mechanic taking the time to recycle the fitting from the old cylinder to the new unit. Too often, this spirals, creating an additional problem by breaking a fitting and then learning you don’t have a spare. This is a complete and avoidable disaster.
The best approach is to “kit” the repair. In our example above, we would not only have the spare cylinder, but we would also have the fittings and flow controls not just on hand but also installed on the air cylinder and ready to go. This makes the repair as simple as disconnecting airlines, removing the bad cylinder, installing the new cylinder, and connecting the pneumatic lines.
Another example of kits gets me strange looks, but I do it because it makes sense. When I receive sensors or sensor cables with leads, I make a small hole in the packaging to pull the sensor cable out a few inches. I then strip the cable with my Jokari Sensor Special “Mini” Automatic Wire Stripper, strip the leads with my Jonard WSA 1439 Self-Adjusting Wire Stripper, and crimp on wire ferrules with Knipex Automatic Wire Stripper 12 12 02. It’s a lot easier to prep the wires on the bench, and of course, it reduces machine repair time. Sometimes, I’m asked, “What if the application doesn’t require ferrules?”. The answer is simple: they are easier to remove than install and generally speaking, most sensor installations are improved with ferrules.
A small benefit of kitting is you consume inventory spares like fittings before performing the repair, giving you time to replace them. However, a better method is to order everything you need to do the job and not deplete your inventory.
Some repairs require special tools; having those tools in the parts kit is often worth it. Sticking with our air cylinder example, small air cylinders often feature wrench flats that are difficult to utilize. Store the appropriate wrench with the replacement air cylinder. If an air cylinder utilizes position sensors requiring a hex key wrench or screwdriver, include the tool in the kit. Note: You can use a proximity sensor tester such as the Banner DBQ5 DC Proximity Sensor Tester, which allows you to set the correct sensor position without operating the machine.
Kits are one of the best ways to Reduce Machine Repair Time.
Labeling
5-Labeling: Labeling machine parts, wires, sensors, valves, pneumatic lines, and other critical components makes troubleshooting and facilitating repairs easier. I like to include as much helpful information as possible, such as voltage, direction, orientation, function, PLC tag, or address. Labeling also aids with communication to confirm everyone involved is discussing the same item.
Lastly, ensure your team replaces any labels removed during maintenance and repair. I use a Brady BMP41 Handheld Label Maker on our equipment.
Documentation
6-Documentation: Repairing machinery and equipment can be challenging. Not having product manuals, specification sheets, wiring diagrams, schematics, and repair history can turn a simple job into a project. I like to have master documents stored in the cloud to be readily available to the team for printing. Original documents stored locally, whether at the machine or maintenance shop, will eventually lead to missing or useless documents.
I prefer to keep all documentation in the Adobe Acrobat PDF format. This allows me to group documents in what Adobe calls “Binders.” I also highlight document details and mark them with helpful information and changes in a clean, easy-to-use manner. For example, I add calibration data to Omega Engineering DP41E process meter instruction manuals. I mark up the Ateq leak tester’s terminal assignments with the wiring information for the machines they are attached to.
Quality of Repair
7-Quality of repair: Presently under a rewrite.
Stop, Look & Listen
8-Stop, Look & Listen: Too often, I witness a maintenance mechanic or technician complete a repair while ignoring other potential issues outside the initial repair. For example, a machine operator calls maintenance to repair a broken proximity sensor. The mechanic completes the repair but fails to notice a pneumatic flow control leaking air, a loose timing belt, broken cable ties on a servo motor encoder cable, or a noisy bearing. These additional issues will most likely result in another callback and downtime soon. These are significant missed opportunities to address problems while the machine is still under the maintenance team’s control.
In a best-case scenario, the maintenance person could spend more time on the machine and correct the newly found issues. If the additional repairs can’t be completed promptly, they can be scheduled and prepared for at least.
Note: To Reduce Machine Repair Time, this should tie into your 5s: “Clean to Inspect, Inspect to Detect, Detect to Correct, Correct to Perfect.”
Audit Repairs
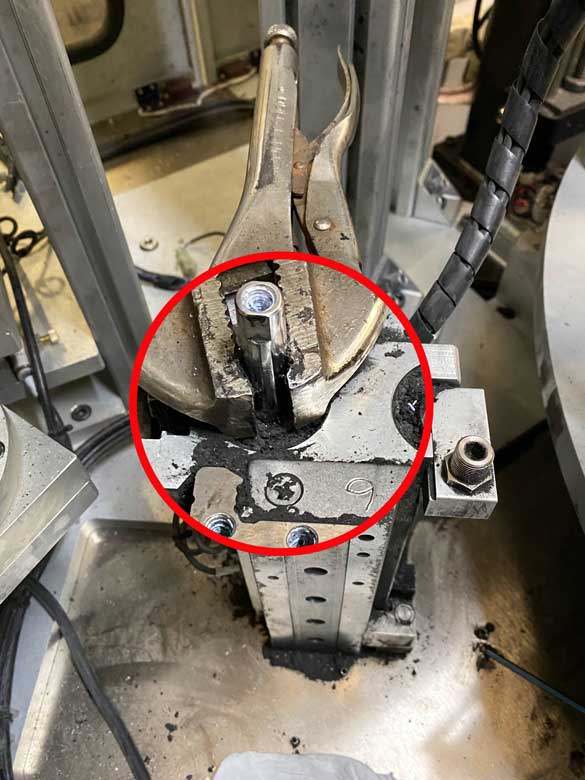
Vise Grips Causing Damage to an Air Cylinder Piston
9-Audit Repairs: As the maintenance manager, you have expectations for the equipment’s maintenance and repair methods and quality. It’s essential to audit the work of your team. This audit serves a few purposes. The apparent purpose is to ensure a task is performed satisfactorily with the proper tools and correct parts. Sometimes, individuals will take shortcuts and/or use the wrong tools, which can cause a new problem worse than the original one.
Beyond that, it also serves as a tool to learn team member’s strengths and weaknesses. If weaknesses are observed, training can be administered at a later time. The other side of this equation is that the maintenance technician or mechanic often develops a technique or tip that can be shared with other team members.
Communicate
10-Communicate: Preparation is vital: properly equipped tool carts (tools & parts), Documentation, Labeling, Meetings, lessons learned, asking “why.” Take time to do it right, reduce callbacks, and monitor and audit repairs.